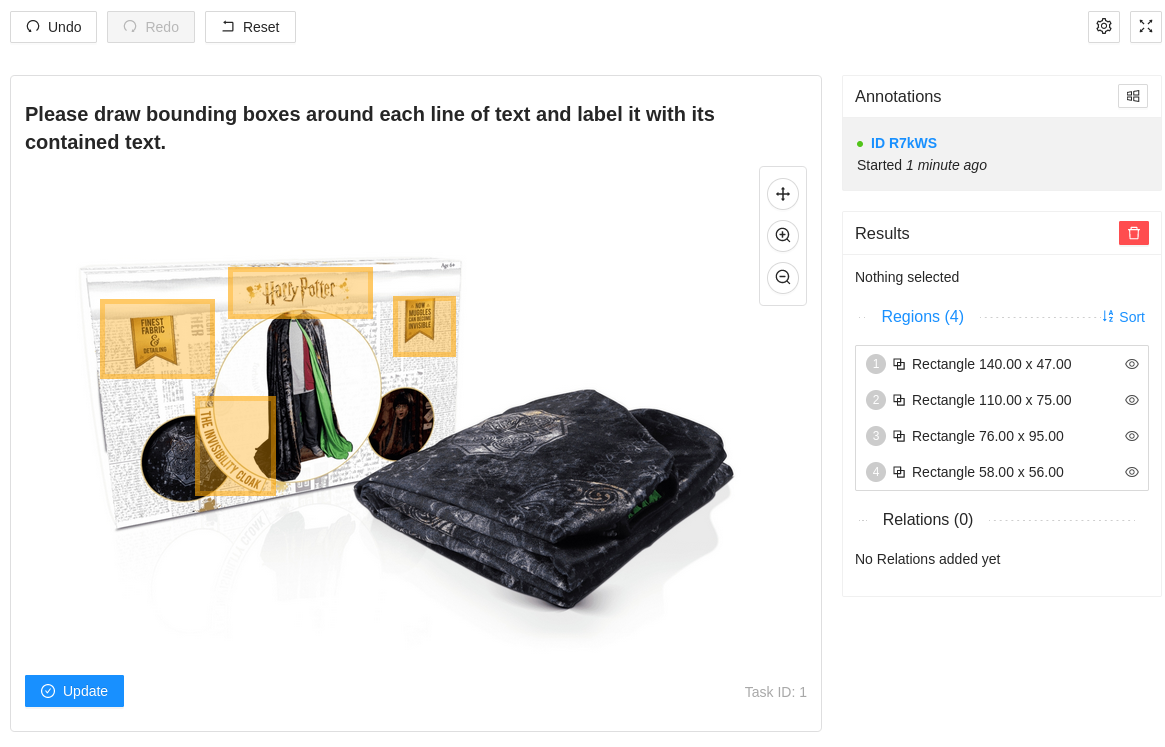
Label Studio example
Here we will show an example of how to use Label Studio to label images for object detection.

As discussed before we will be using the Label Studio to create a labeling task for object detection. Here is an example of how to use Label Studio to create a labeling task for object detection. We have some HTML tags, that contain style sheets, the div that will be the container for Label Studio, library and scripts to initialize Label Studio.
Template
<!-- 📚 Load in resources: [Bulma, Effect Network Styling] -->
<!-- Include Label Studio stylesheet -->
<link href="https://unpkg.com/label-studio@1.0.1/build/static/css/main.css" rel="stylesheet">
<!-- Create the Label Studio container -->
<div id="label-studio"></div>
<!-- Include the Label Studio library -->
<script src="https://unpkg.com/label-studio@1.0.1/build/static/js/main.js"></script>
<script src="https://cdn.jsdelivr.net/npm/ipfs-http-client/dist/index.min.js"></script>
<!-- Initialize Label Studio -->
<script>
// setInterval(() => { window.forceResize() }, 500);
const ipfs = window.IpfsHttpClient.create({ host: 'ipfs.effect.ai', port: 443, protocol: 'https' });
const ann = '${annotations}'.length === 0 ? '[]' : '${annotations}';
console.log(ann);
var labelStudio = new LabelStudio('label-studio', {
config: `
<View>
<Header value="Please draw bounding boxes around each line of text and label it with its contained text."/>
<Image name="image" value="$ocr" zoom="true" zoomControl="true"/>
<Rectangle name="bbox" toName="image" strokeWidth="3"/>
<TextArea name="transcription" toName="image" editable="true" perRegion="true" required="true" maxSubmissions="1" rows="5" placeholder="Recognized Text" displayMode="region-list"/>
</View>
`,
interfaces: [
"panel",
"update",
"submit",
"controls",
"side-column",
"annotations:menu",
"annotations:current"
],
user: {
pk: 1,
firstName: "Effect",
lastName: "Network"
},
task: {
annotations: JSON.parse(`${annotations}`.replace(/"/g,'"')),
predictions: [],
id: ${id},
data: {
ocr: "${image}"
}
},
// task: {
// annotations: JSON.parse('[]'),
// predictions: [],
// id: 1,
// data: {
// ocr: "https://ipfs.effect.ai/ipfs/QmX6FcAAfS9SL9KkKhiZumAUeaAyr4HsWp3rHopjzQSSg4"
// }
// },
onSubmitAnnotation: function(ann) {
updateOrSubmitAction()
},
onUpdateAnnotation: async function(LS, ann) {
updateOrSubmitAction()
},
onLabelStudioLoad: function(LS) {
var c = LS.annotationStore.addAnnotation({ userGenerate: true });
LS.annotationStore.selectAnnotation(c.id);
}
});
function updateOrSubmitAction () {
if (window.confirm('Do you want to submit your annotations?')) {
submitResults()
.then(console.log)
.catch(console.error)
} else {
console.log('Submission cancelled')
}
}
function timeout(ms) {
return new Promise(resolve => setTimeout(resolve, ms));
}
const submitResults = async function () {
let LS = labelStudio;
// let res = LS.annotationStore.annotations.filter(a => a.id == ann.id)[0].serializeAnnotation();
let res = LS.annotationStore.annotations[0].serializeAnnotation();
if (res && res.length === 0) {
const confirm = window.confirm('No annotations found. Are you sure you want to submit?')
if (!confirm) {
return
}
} else {
try {
let hash
const uploadResult = {
id: `${id}`,
annotations: [{
id: `${id}`,
result: res
}],
data: {
image: `${image}`
}
}
// console.log(res)
// console.log(uploadResult);
await Promise.all([
// post result to ipfs, and remove single quotes from answers.
hash = await ipfs.add(JSON.stringify(uploadResult)),
await parent.postMessage({'task': 'submit', 'values': hash.path}, '*'),
await timeout(1000)
])
console.log('uploading cid', hash);
} catch (error) {
alert("Something went wrong, please create a ticket in our Discord for help")
console.error('Failed to upload to IPFS', error)
}
}
};
</script>Input Schema
Note that you can also define the input and output schema for a given template. This will allow you to define the structure of the data that will be used in the labeling task and the output that will be generated by the annotators.
{
	"$schema": "http://json-schema.org/draft-07/schema#",
	"type": "object",
	"properties": {
		"id": {
			"type": "string"
		},
		"annotations": {
			"type": "array",
			"items": {
				"type": "object",
				"properties": {
					"id": {
						"type": "string"
					},
					"result": {
						"type": "array",
						"items": {
							"type": "object",
							"properties": {
								"original_width": {
									"type": "integer"
								},
								"original_height": {
									"type": "integer"
								},
								"image_rotation": {
									"type": "integer"
								},
								"value": {
									"type": "object",
									"properties": {
										"x": {
											"type": "number"
										},
										"y": {
											"type": "number"
										},
										"width": {
											"type": "number"
										},
										"height": {
											"type": "number"
										},
										"rotation": {
											"type": "integer"
										},
										"text": {
											"type": "array",
											"items": {
												"type": "string"
											}
										}
									},
									"required": ["x", "y", "width", "height", "rotation"]
								},
								"from_name": {
									"type": "string"
								},
								"to_name": {
									"type": "string"
								},
								"type": {
									"type": "string"
								}
							},
							"required": [
								"original_width",
								"original_height",
								"image_rotation",
								"value",
								"from_name",
								"to_name",
								"type"
							]
						}
					}
				},
				"required": ["id", "result"]
			}
		},
		"data": {
			"type": "object",
			"properties": {
				"image": {
					"type": "string"
				}
			},
			"required": ["image"]
		}
	},
	"required": ["id", "annotations", "data"]
}
Example output data
This is what the output data will look like after the annotators have labeled the images.
{
	"id": 1,
	"created_at": "2021-03-09T21:52:49.513742Z",
	"updated_at": "2021-03-09T22:16:08.746926Z",
	"project": 83,

	"data": {
		"image": "https://example.com/opensource/label-studio/1.jpg"
	},

	"annotations": [
		{
			"id": "1001",
			"result": [
				{
					"from_name": "tag",
					"id": "Dx_aB91ISN",
					"source": "$image",
					"to_name": "img",
					"type": "rectanglelabels",
					"value": {
						"height": 10.458911419423693,
						"rectanglelabels": ["Moonwalker"],
						"rotation": 0,
						"width": 12.4,
						"x": 50.8,
						"y": 5.869797225186766
					}
				}
			],
			"was_cancelled": false,
			"ground_truth": false,
			"created_at": "2021-03-09T22:16:08.728353Z",
			"updated_at": "2021-03-09T22:16:08.728378Z",
			"lead_time": 4.288,
			"result_count": 0,
			"task": 1,
			"completed_by": 10
		}
	],

	"predictions": [
		{
			"created_ago": "3 hours",
			"model_version": "model 1",
			"result": [
				{
					"from_name": "tag",
					"id": "t5sp3TyXPo",
					"source": "$image",
					"to_name": "img",
					"type": "rectanglelabels",
					"value": {
						"height": 11.612284069097889,
						"rectanglelabels": ["Moonwalker"],
						"rotation": 0,
						"width": 39.6,
						"x": 13.2,
						"y": 34.702495201535505
					}
				}
			]
		},
		{
			"created_ago": "4 hours",
			"model_version": "model 2",
			"result": [
				{
					"from_name": "tag",
					"id": "t5sp3TyXPo",
					"source": "$image",
					"to_name": "img",
					"type": "rectanglelabels",
					"value": {
						"height": 33.61228406909789,
						"rectanglelabels": ["Moonwalker"],
						"rotation": 0,
						"width": 39.6,
						"x": 13.2,
						"y": 54.702495201535505
					}
				}
			]
		}
	]
}
Script
You can use the following script to initialize Label Studio and create a labeling task for object detection. This script uses bun.sh.
import { WalletPluginPrivateKey } from "@wharfkit/wallet-plugin-privatekey";
import {
	createClient,
	createCampaign,
	eos,
	Session,
	type CreateCampaignArgs,
} from "@effectai/sdk";

const campaignFile = Bun.file("index.html");
const inputSchema = Bun.file("input-schema.json");
const exampleTask = Bun.file("example.json");

const session = new Session({
	chain: eos,
	actor: "your_account",
	permission: "your_permission",
	walletPlugin: new WalletPluginPrivateKey("your_private_key"),
});

const client = await createClient({ session });

const campaign: CreateCampaignArgs = {
	client: client,
	campaign: {
		category: "category",
		description: "Description for this Campaign",
		estimated_time: 1,
		example_task: exampleTask.toString(),
		image: "image",
		instructions: "Instructions for this Camapign",
		input_schema: inputSchema.toString(),
		output_schema: null,
		template: campaignFile.toString(),
		title: "Title for this Campaign",
		version: 1,
		reward: 1,
		maxTaskTime: 1,
		qualifications: [],
	},
};

const response = createCampaign(campaign);
console.debug(response);